Showing posts with label Hair 101. Show all posts

My Night Time Routine: What's Yours?


One of the top ten questions I receive is: What do you do to your hair at night? The answer is: It depends on how I am wearing my hair!


If I am wearing more of a wavy-bouffant-like twist out like the one pictured above I do the following:
- Lightly spritz hair with Oyin's Juices & Berries
- Stuff all hair under a satin bonnet
- Fluff hair in the morning, and finger style

This will usually last about 3-4 days before I need to re-twist it to refresh the curl pattern. When I refresh the curl pattern, I do the following:
- Lightly spritz hair with water until damp [doesn't have to be soaking wet]
- Apply some type of butter-based product; my product of choice is Qhemet Biologics Amla & Olive Heavy Cream [I don't like to pack on more gel-like products when I am re-twisting, as it always turns out stiff]
- Make about 10-12 twists [make sure they are as tight as possible]
- Stuff twists under a satin bonnet
- Untwist in the morning, fluff and finger-style
- I normally wear this style for about a week before it needs to be shampooed
Tip: Because the hair wasn't saturated with water, the curls/waves may not be AS defined as they were the first few days; if you would like more of a defined curl, sit under a hard bonnet dryer for about 30 minutes after re-twisting.


If I am wearing more of a defined twist out, and I want to keep it defined; this is my nightly routine:
- Lightly spritz hair with rose water
- Re-twist hair in sections about an inch wide [I keep the sections smaller for more curl definition]
- Saturate the ends of twists with water [this helps keep the ends curled], then seal with oil [this helps seal in moisture, and helps prevents single strand knots + splits]
- Sleep on silk pillowcase [When my twists are smaller, I like to use a silk pillowcase versus stuffing the twist under a bonnet. For some reason, it turns out better this way.
- Untwist in the morning, fluff, and finger style
Tip: To keep this style as fresh as possible; limit your use of butter-based products AND gels. As you can see, for this particular style I only use water [to refresh and moisturize], and oil [to seal in moisture and keep ends healthy]. With this routine, I can usually go a good two weeks before having to shampoo again!
Why Do I Use Rose Water? Simple; it makes my hair uber soft! I usually get Rose Water cheap from my local Indian Grocery Store.

Here are some of my product recommendations:
To Lightly Moisturize Hair:
Oyin's Juices & Berries
Carol's Daughter Tui Leave-In
Jane Carter Revitalizing Leave-In

My Favorite Butter-Based Moisturizers:
Qhemet Biologics Amla & Olive Heavy Cream [suitable for thick, coarse, hair that tends to be on the drier side]
Qhemet Burdock Root Butter Cream [thinner than Amla & Olive, perfect for those with finer hair]
Oyin's Whipped Pudding [thin enough for fine-haired curlies, moisturizing enough for coarse-haired curlies]

My Favorite Night Time Tools:
Satin Bonnet
Silk Pillowcase
Spray Bottle [for water]
Rose Water

What's your night time routine?

Follow me on Twitter | Add me on Bloglovin' |    

Product Review: Carol's Daughter Hair Milk Line


Recently I had the opportunity to select some products from the Carol's Daughter line to review, so I decided to choose the Hair Milk Line, as well as the Tui Leave-In Conditioner.

My Thoughts On The Shampoo: There aren't too many shampoo's out there that can win my favor, but this one is definitely a keeper. Even though it is SLS free [which is a major plus], it still managed to get my hair clean without that squeaky, stripped feeling. The bonus? My hair was soft, shiny, and full of curls!
I had to take a picture of this because you know I am usually one to complain that I have zero curl definition; this definitely lived up to it's claim! The pics really don't do it justice!

My Thoughts On The Conditioner: This conditioner is THICK which is a good thing considering my hair laughs at any conditioner thinner than the consistency of yogurt. I used this without heat so I would truly know how this product worked; needless to say, I was pleasantly surprised. Usually any conditioner that works well without the assistance of heat is a friend of mine. My hair was soft, manageable, shiny, and the curls were poppin'!

My Thoughts On The Tui Leave-In: I used this before adding the hair milk curl booster, and it made detangling my hair a breeze. I separated my hair in about six sections, and lightly spritzed each section prior to detangling. I like that this is light enough to use for free flowing hair styles, as it doesn't leave a sticky, tacky residue; just soft shiny hair. This will definitely be a staple for wash n go's, refreshing twists, and daily moisturizing.

My Thoughts On The Hair Milk Curl Booster: I'm going to have to say this is my favorite out of the bunch. I was a little worried that the consistency of this wouldn't quench my curls, however it did that and then some. It managed to moisturize my hair without leaving a greasy residue, which I appreciate greatly. For once my curls were defined without cooing and prodding. Because my curls were so defined from using the products above, I decided to add a little bit of gel and wear my hair curly for the day!  

Here's the pic:[I swear I don't do my hair while in heavy eye make up, it was for a YouTube tut]


I suppose that giddy grin means I am happy with my new products...lol

A day later I decided to shampoo, condition, and moisturize my hair [with the same products]; I then twisted it using only the Tui Leave-In & Hair Milk Curl Booster as my stylers. I let it dry overnight, and untwisted my hair in the morning. Hello curl definition!  
This was the finished product:

Would I purchase these? Definitely. Any product that works to keep my hair soft, shiny, and free of frizz whilst enhancing curl definition is a keeper. That takes the 95% of the fuss out of doing my hair, as lack of definition, and moisture is usually what precedes a bad hair day.

A little bit about The Hair Milk Line [according to the website]:
Hair Milk Curl Perfecting Shampoo [$16 10oz]: A nourishing shampoo for the type of hair that needs it most...curls. Cuts frizz, gently removes dirt, oil and product build-up. Made with essential oils plus Vitamin A to help condition the scalp and keep moisture in. Gives curls what they need for that desired healthy, bouncy look.
Pro-vitamin B5 (Panthenol) – Helps minimize tangles and balance moisture
Vitamin A (Retinyl Palmitate) – Scalp conditioner that also protects from moisture loss. Plus protects from environmental damage.
Vitamin E (Tocopherol) – Conditioner that protects from environmental damage.
Essential Oils of Orange and Lemon
Paraben-Free, No Petroleum, Mineral Oil or Artificial Color
SLS/SLES/Sulfate-Free

Hair Milk Curl Perfecting Conditioner [$19 10oz]: The perfect companion to our nourishing, Curl Perfecting Shampoo. An indulgent, penetrating, moisture treatment that restores while supporting healthy-looking natural curls. Made with essential oils plus Pro-Vitamin B5 and Biotin to help replenish and strengthen hair with the natural nutrients it’s thirsting for, leaving your curls under control…which is where they belong.
Pro-vitamin B5 (Panthenol) – Helps minimize tangles and balance moisture
Biotin (Vitamin H): Strengthens hair follicles and helps promote healthy hair.
Vitamin A (Retinyl Palmitate) - A Vitamin A derivative known for its antioxidant properties and acts as a scalp conditioning agent. It also protects against moisture loss and environmental damage.
Vitamin E (Tocopherol) – An antioxidant and conditioning agent that protects hair from environmental damage.
Essential Oils of Orange and Lemon
Paraben-Free, No Petroleum, Mineral Oil or Artificial Color

Hair Milk Lite: The Curl Booster [$9-20 2oz - 10oz]: A curl’s best friend. A curl boosting, weightless lotion that tames frizz while defining your curls. Adapted from our famous original formula, Hair Milk Lite is made with essential oil of Lemon and Vitamin C for an extra light, moisturizing hold.
Apricot Kernel Oil - Increases moisture
Cocoa & Shea Butter - Conditions the scalp and hair
Vitamin C - Protects from environmental damage
Lemon Essential Oil - Gives this formula it’s energizing and uplifting fragrance
Paraben-Free, No Petroleum, Mineral Oil or Artificial Color
Tui Leave-In Conditioner [$12 8oz]: The Tui Leave-in-Conditioner is a delicious herbal blend that weightlessly conditions with hydrating ingredients while controlling fly-aways, unmanageable hair and restoring hair’s natural health. Used as a daily leave-in or revitalizing mist, Tui Leave-in Conditioner’s excellent detangling properties replenish essential moisture delivering a delightful cocktail of fruit fragrances!
  • Replenishes essential moisture, controls fly-aways and unmanageable hair
  • No harsh, moisture-stripping detergents
  • Infused with lavender, calendula, chamomile, rose, marigold and larkspur flowers
  • Paraben-free, No Petroleum, No Mineral Oil, No Artificial Color
Follow me on Twitter | Add me on Bloglovin' |    

    Regimen Building: Go Ayurvedic Part 2


    In part 1 of our Ayurvedic series, we focused more on different shampoo methods. However this time we are going to touch more on various conditioning & moisturizing methods.

    A few notes before we get started:
    Most if not ALL of these herbs can be purchased at Indian grocery stores. If you do not have an Indian grocery store in your area, you can always find these ingredients online. For your convenience, I have linked each ingredient to it's online source in the event you have a hard time finding it on ground.  

    Before you apply any of these Ayurvedic conditioners, it is recommended that you oil your hair thoroughly beforehand. I recommend Coconut Oil, as it is the easiest to obtain, inexpensive, and very effective. 

    Some of you may find difficulty completely rinsing out mixtures that call for powdered herbs. I have found that soaking your hair in a tub filled with water is the easiest method to remove excess residue.

    A little bit about each ingredient in these featured formulations:
    Hibiscus Petal Powder - Conditions hair, promotes healthy hair growth, prevents hair loss, thickens hair
    Marshmallow Root Powder - Nourishes hair follicles and scalp, conditioning properties, imparts shine 
    Amla Powder - Stimulates hair growth, has wonderful conditioning properties, strengthens hair at the roots
    Kalpi Tone - Promotes hair growth, prevents pre mature balding, light conditioning properties, imparts shine 
    Fenugreek Seed Powder - Prevents hair loss, promotes hair growth, helps strengthen hair shaft, light protein Brahmi Powder - Strengthens hair at the roots, helps relieve dandruff, also purported to thicken hair
    Bhringraj Powder - Promotes hair growth, prevents pre mature balding, light conditioning properties 
    Aloe Vera Gel - Promotes hair growth, balance PH level, heal scalp, imparts sheen, light conditioning properties, nourishes hair follicles, and scalp 
    Orange Peel - Imparts incredible shine, light conditioning properties 
    Stinging Nettle - Nourishes hair and scalp, imparts shine, light conditioning properties 

    Conditioner Mix 1
    4 tbs Hibiscus Petal Powder
    4 tbs Marshmallow Root Powder
    3 tbsp Amla Powder
    In a medium size bowl, mix all ingredients together with enough spring water to make a thick paste. Gently section your hair, and use an applicator brush to generously apply the mixture starting at the scalp, and working your way down the hair shaft. Cover with a plastic cap and allow mixture to sit on head for about 45minutes-hour. 
    How Often?
    Once Weekly  

    Conditioner Mix 2
    4 tbs Hibiscus Petal Powder
    3 tbs Kalpi Tone
    1 tbs Fenugreek Seed Powder [Methi]
    In a medium size bowl, mix all ingredients together with enough spring water to make a thick paste. Gently section your hair, and use an applicator brush to generously apply the mixture starting at the scalp, and working your way down the hair shaft. Cover with a plastic cap and allow mixture to sit on head for about 45minutes-hour. 
    How Often
    Once Weekly

    For those of you that aren't too keen on conditioning your hair w/o a creamy base, I have a few tried and true recipes utilizing conditioner as a base. 

    Creamy Conditioning Mix 1
    1/4 cup VO5 Moisture Milks; Strawberries & Creme Conditioner 
    1/4 cup Coconut Oil
    2 tbs Hibiscus Petal Powder
    2 tbs Brahmi Powder
    2 tbs Bhringraj Powder 
    In a medium size bowl, mix all ingredients together and use immediately. Gently section your hair, and use an applicator brush to generously apply the mixture starting at the scalp, and working your way down the hair shaft. Cover with a plastic cap and allow mixture to sit on head for about 45minutes-hour. 
    How Often
    Once Weekly  

    Deep Conditioning Mix 
    1/4 cup Aveda Damage Remedy Conditioner
    1/4 cup Coconut Oil
    2 tbs Hibiscus Petal Powder
    2 tbs Brahmi Powder
    2 tbs Bhringraj Powder 
    1 tbs Fenugreek Seed Powder [Methi]
    In a medium size bowl, mix all ingredients together and use immediately. Gently section your hair, and use an applicator brush to generously apply the mixture starting at the scalp, and working your way down the hair shaft. Cover with a plastic cap and allow mixture to sit on head for about 45minutes-hour. 
    How Often? 
    Once Weekly 
     
    Keeping your hair thoroughly moisturized should be part of everyone's healthy hair care regimen. The beauty of mixing your own products, is that you can swap out herbs to better suit your needs. Here are a few low-cost, highly effective moisturizing spritz's. 

    Herbal Moisturizing Spritz 1
    1/3 cup Aloe Vera Gel
    2 tbsp Hibiscus Petal Powder
    2 tbsp Marshmallow Root
    1 1/4 cups Distilled Water
    Bring distilled water to a boil, then let cool slightly. Add Hibiscus Petal Powder and Marshmallow root to water, and allow to steep for 30 minutes. Strain mixture through cheesecloth, and add Aloe Vera Gel to liquid. Pour mixture in a spray bottle, and store in refrigerator for up to one week.
    How Often?
    As needed

    Herbal Moisturizing Spritz 2
    1/3 cup Aloe Vera Gel 
    2 tbsp Hibiscus Petal Powder
    2 tbsp Orange Peel 
    1 tbsp Stinging Nettle
    1 1/4 cups Distilled Water
    Bring distilled water to a boil, then let cool slightly. Add Hibiscus Petal Powder, Orange Peel Powder, and Stinging Nettle to water, and allow to steep for 30 minutes. Strain mixture through cheesecloth, and add Aloe Vera Gel to liquid. Pour mixture in a spray bottle, and store in refrigerator for up to one week.
    How Often?
    As Needed


    Specialty Treatments
    Herbal Hair Cream - Perfect for those looking for a nice creamy, all natural styler that offers a bit of hold. The Brahmi and Amla offer conditioning properties whilst promoting hair growth, and strengthening hair at the roots. The Shealoe leaves hair soft, smooth, manageable and shiny!
    Try It:
    1oz Shealoe Butter
    3 tbs Brahmi Oil
    3 tbs Amla Oil 
    Mix all ingredients well, add to sterile jar; store in cool area.

    MTM's Homemade Vatika Oil - This was definitely one of my favorite herbal oils. This oil is formulated with herbs that nourish and heal the scalp, promotes hair growth, imparts shine, softness, and manageability.
    Try It:
    2 Cups Coconut Oil
    1 tbsp Stinging Nettles
    1 tbsp Amla Powder
    1 tbs Bhringraj Powder
    1 tbsp Brahmi Powder
    1 tbsp Orange Peel Powder
    1 tbsp Neem Powder
    1 tbsp Henna Leaf Powder
    Add ingredients to a crock pot set on the lowest setting; leave overnight. Strain herbal oil several times through a cheesecloth, and add to squeeze bottle.  To make even a stronger herbal infusion, take your herbal oil, and add a fresh batch of herbs [in the same quantities listed] and place the mixture back in the crock pot [set on low] for another 24 hours. Strain mixture again, and bottle.

    Follow me on Twitter | Add me on Bloglovin' |    

    Instant Funk.


    Shawls & Scarves over your frohawk, try this one from American Apparel. 
    One of my fav LHCF members; "Black Masterpiece" shows you how to create a frohawk, similar to this one!
    Lace scarves as head wraps; try this one from Urban Outfitters for a fun take on it.

    Boho Dresses & Accessories; This one from Etsy has my heart; I'll take this leather satchel too.

    Who doesn't love ethnic prints? Asos has them for cheap!

    Funky floral patterns

    My personal favorite; playing with color! 
    Play with your hair color too!
    Bold colors & harem pants; two of my fav trends right now!

    All pictures courtesy of Fuckyeahcurls, & KinkyKeekers

    Follow me on Twitter | Add me on Bloglovin' |    

    Regimen Building: Go Ayurvedic! Part 1

     [source]

    One of my favorite and most effective regimen's thus far [and unfortunately most complex] has been my Ayurvedic Regimen. I can honestly say it greatly contributed to the growth, thickness, and overall health of my hair. I maintained a strict Ayurvedic regimen for the first six months of my hair journey, however due to time restraints, I had to simplify things a bit more.

    Ayurvedic regimens are effective, and easily customizable to suit your hair needs. Most importantly, the ingredients are inexpensive and all natural. I have decided to break this post into several parts as not to overwhelm/bore anyone out there. In this installment, we will discuss the basic ingredients found in most Ayurvedic Products, as well as their benefits. I will also talk about Shampoo methods and list a few formulations for specialty treatments that have worked wonders for me. Part 2 will focus more on conditioning & moisturizing methods, and I will also list a few more specialty treatment formulations as well!

    Here are some herbs/ingredients you should get familiar with:
    Bhringraj - Treats hair loss, premature graying, and also acts as a conditioner
    Neem - Is an antibacterial powerhouse, it helps correct scalp issues, as well as promote healthy hair growth
    Brahmi - Strengthens hair at the roots, helps relieve dandruff, also purported to thicken hair
    Amla - Stimulates hair growth, has wonderful conditioning properties, strengthens hair at the roots
    Shikakai - Acts as a natural cleanser, and mild conditioner, whilst promoting hair growth
    Aritha [Reetha] - Natural cleansing agent
    Methi [Fenugreek] - Prevents hair loss, promotes hair growth, helps strengthen hair shaft, light protein
    Hibiscus - Conditions hair, promotes healthy hair growth, prevents hair loss, thickens hair

    Shampoo:
    Some shampoo's contain harsh sulfates and surfactants that strips the hair of it's natural oils, leaving it dry, brittle, and lifeless. If you are building an Ayurvedic regimen, try some of these options instead: 

    Shampoo Bars: I absolutely love Ayurvedic "Poo Bars". Look for bars that are formulated with vegetable oils/nut oils, and skip the bars that are loaded with surfactants [these are usually added to help with cleansing and lather] often these can leave your hair feeling drier than the Sahara. Shampoo Bars are easy to use, pretty inexpensive compared to a bottle of shampoo, and will leave your hair much softer to boot. Because these bars are au-naturale they have a tendency to produce a very mild-lather, so don't expect all the sudsy goodness like that of your normal shampoo.

    I Recommend:
    The Chagrin Valley Ayurvedic Shampoo Bar was my favorite; it's formulated with Bhringraj, Amla, Hibiscus, Aritha, Mango Butter, Coconut Milk, and a slew of other hair-loving ingredients. A second favorite that can be purchased at your local Indian Grocer, is Godrej Shikakai Shampoo Bar; this is more of a basic bar [but stellar none-the-less] with Bhringraj, Amla, & Shikakai. 
    How Often?
    I used Shampoo Bars every-other week
    Tips:
    Because shampoo bars aren't loaded with additional chemicals, it can be hard to remove product residue/buildup. I recommend soaking wet, dirty hair in a Clarifying ACV mixture [1/2 cup ACV + 1 cup water, spritz hair with mixture, then cover with plastic cap] for about 20 minutes prior to shampooing, as this will gently clarify the hair.

    Cleansing Mixtures: I will admit that these were somewhat difficult to use at first, not because they weren't effective, but because I had a hard time wrapping my brain around using powder and water as my shampoo du jour. These leave your hair feeling soft, conditioned, and strong! 

    I Recommend:
    Mix #1 [my favorite]
    2 Tablespoons of Amla
    2 Tablespoons of Shikakai
    1 Tablespoon of Hibiscus 

    Mix #2
    2 Tablespoons Amla
    2 Tablespoons Shikakai
    1 Tablespoon Neem Powder

    For each formulation, mix with enough water to make a thick paste. Apply evenly on wet, freshly pre-conditioned hair [see the pre-shampoo treatment below], and massage gently massage mixture on to scalp. Allow to sit on hair for about 15 minutes, then rinse thoroughly with cool water. Follow up with a basic light ACV rinse to remove any additional oils/residue left behind. [1/2 cup of ACV + 2 cups water] 
    How Often:
    2x monthly. I would alternate between these cleansing mixtures and the Shampoo Bars. 

    Tips:
    For maximum softness, I recommend doing Pre-Shampoo treatments before applying any type cleansing mixture [because the Shikaki has a tendency to be a tad bit drying]. Simply oil your hair thoroughly with Coconut Oil, cover with a plastic cap, and allow to sit for about an hour [or more if possible], then rinse w/lukewarm water.


    Specialty Treatments:

    Neem Oil + Tea Tree Treatment: Perfect for those with psoriasis, and issues with dandruff. Neem Oil is packed full of antiviral, antifungal, antiseptic, and antibacterial properties, therefore making it the perfect herbal solution for curing scalp ailments. I am warning you all now; this stuff has a stench that is out-of-this-world. However, it works :-)
    Try It:  
    In a large bowl, mix 1/4 cup of Neem Oil with 6 drops of Tea Tree Oil. Pour oil mixture over head, massage into scalp, and cover for about an hour. - Use this treatment on dry, unwashed hair.

    Coconut Milk Protein Treatment: This is an easy, inexpensive way to do an all natural protein treatment at home. The nutrients in Coconut Milk encourages healthy hair growth, and also helps strengthen hair.
    Try It:
    In a large bowl, mix one can of Coconut Milk, 4 tbsp of honey and 4 tbsp of Olive Oil. Carefully pour mixture over head, and cover for about 30 minutes. - Use this treatment on dry, unwashed hair. 

    Hibiscus Rinse: Doing a final rinse with Hibiscus Petal Powder leaves your hair feeling soft and conditioned [from the mucilage], it also makes detangling woes, and excess hair loss a thing of the past. 
    Try It:
    Bring 2 cups of water to a boil, then remove from heat. Add 4 tablespoons Hibiscus petals and allow to steep for 10-15 minutes. Strain liquid through sieve, or cheesecloth and discard petals. Pour mixture over your head after rinsing out conditioner. Massage thoroughly, then rinse with cool water after about 5 minutes.

    Henna Treatment: Henna can be used for correcting porosity issues, as a protein treatment, in some cases to loosen your curl pattern. Click here for a tutorial on how to use Henna. 


    Follow me on Twitter | Add me on Bloglovin'

    Hair Quick Tip: Get More Of A Defined Twist Out + Pics


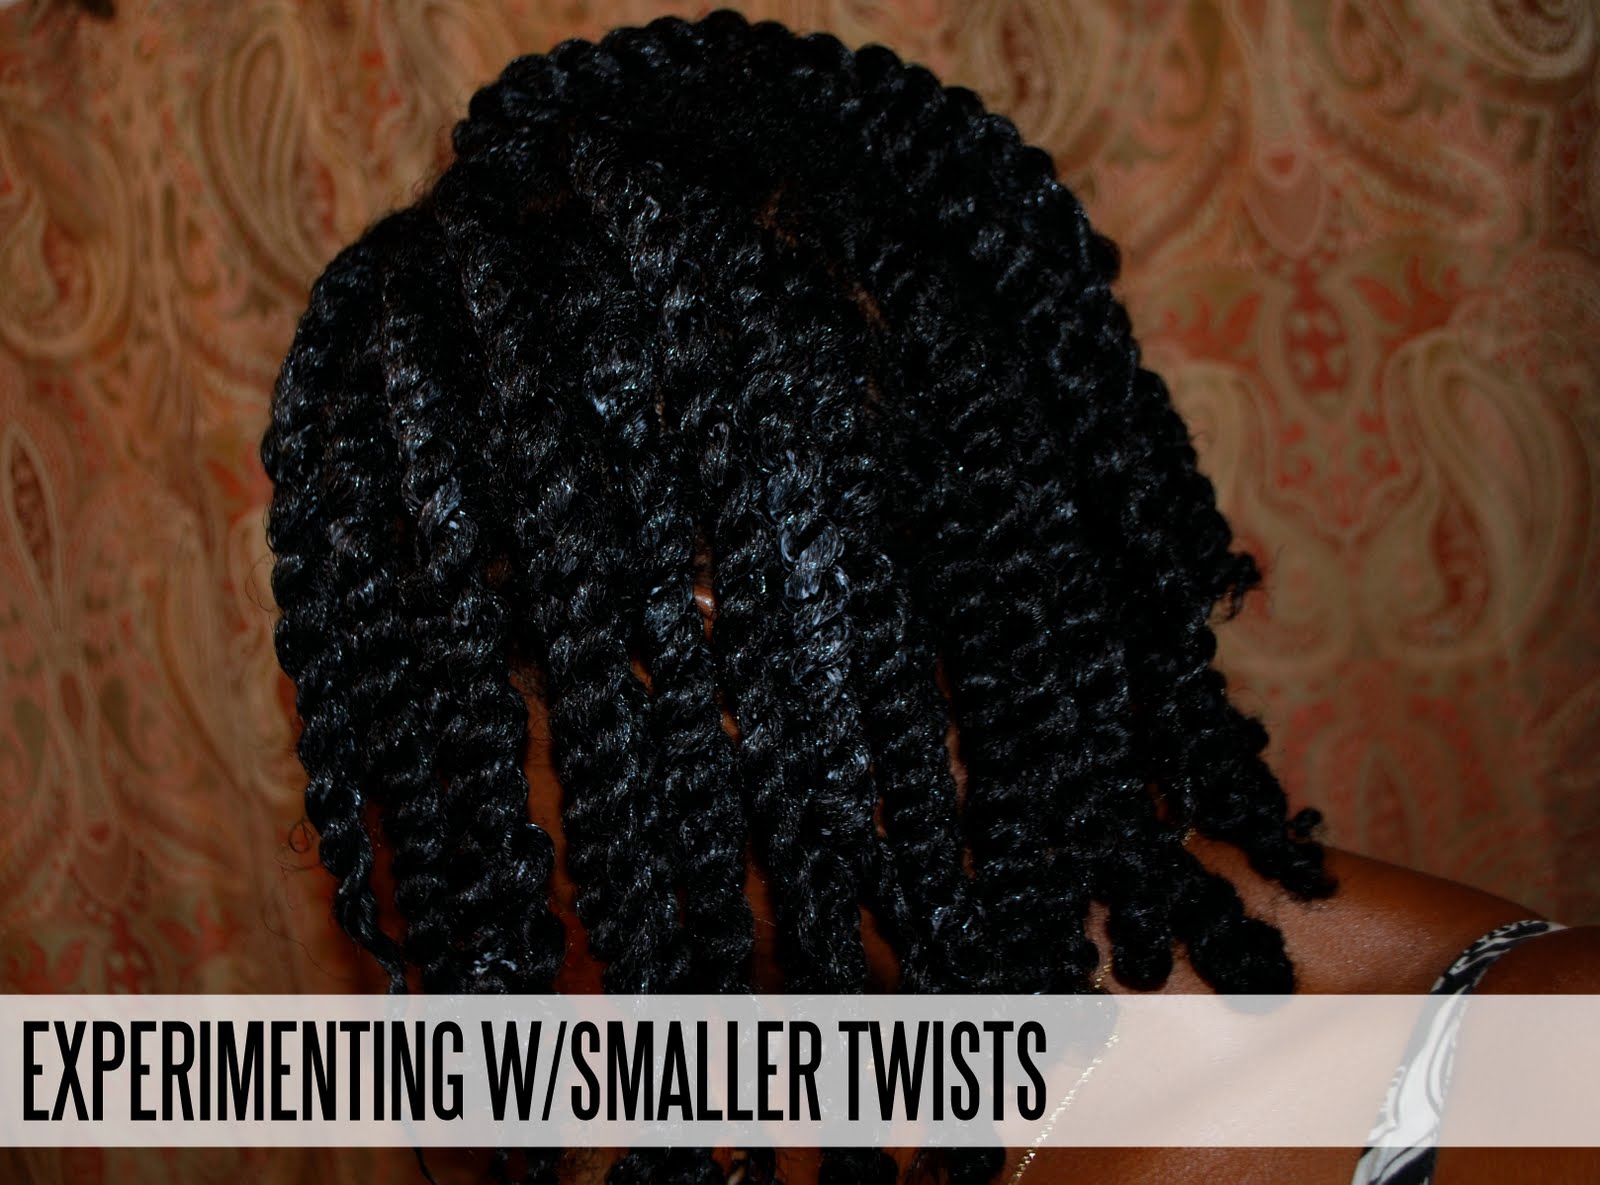
    If you are looking for more definition for your twist outs, try using smaller twists. From experience, I have found that bigger/fatter twists yields more of a bouffant-like set [like this one], while smaller twists give more definition.

    Here's How:
    Shampoo + Condition hair as usual
    Use your favorite creamy leave-in
    Seal in the moisture with your favorite oil
    Using your favorite curl defining cream, twist hair in sections of about 1inch in width - You should have about 20-30 twists
    Allow twists to dry thoroughly before taking down. This is important, as you may have a mass of frizz on your hands if you take the twists down while they are still damp.
    As you take down each twist, separate it into 2-3 sections to create additional volume
    Give your hair a good shake to allow the curls to fall into place naturally


    I used Qhemet Biologics Amla & Olive Heavy Cream as my leave-in because I wanted something thick and heavy on the moisture to go under the Miss Jessie's Curly Pudding. You can use your favorite leave-in, but for maximum softness, opt for something a bit more heavy.

    I also used Vatika Oil [found at most Indian Grocery Stores] to seal the moisture in, and add a bit more softness.  Vatika Oil is just Coconut Oil infused with herbs, so if you are unable to find this product, you can use regular Coconut Oil instead.

    Last but not least, I decided to use Miss Jessie's Curly Pudding for maximum definition.You can use other products such as Komaza Coconut Hair Pudding [another personal fav], or even a gel. I have found that products such as these offer more hold versus butter-based products.


    The Finished Look:


    Follow me on Twitter | Add me on Bloglovin'

    Blow Outs | Curly Fro's & Twist Outs!


    Yesterday I posted a list of my staple products, so today I wanted to give you a little curlspiration to start your weekend off right! Here's my take on each of these looks:

    Blow Out: 
    Use an Ionic blow dryer: I recommend all curly girls invest in a ionic blow dryer! Ionic dryers produce negative ions, resulting in cuticles that remain flat. Flat cuticles equals more moisture retention, sheen, and body.
    Denman Brush: I love this tool for sleek for blow outs, I actually prefer this for blowing out hair versus using it as a detangling brush. It provides great "grip" ensuring a nice smooth, sleek finish.

    Full Curly Fro/Twist Out:
    If your hair is anything like mine, well then it takes major prodding for it to get somewhat of a decent curl. For more of a fuller look, make smaller twists and allow to dry 75%. Then unravel twists, and diffuse the roots of your hair using the medium heat setting until your hair is the desired fullness. [as you diffuse, it should get big]
    Komaza Coconut Curl Pudding & Miss Jessie's Curly Pudding are two of my favorite products to use for a look like this. I find that these products work best for me when I want to achieve bigger, more free flowing hair, as opposed to butter-based products which tend to weigh my hair down a bit.

    Fro-Licious Fro's:
    This isn't about curl definition, or perfection. This is an unapologetic in-your-face fro. Start off on freshly towel dried hair, and make about 4 sections. Detangle each section, and use a good creamy leave-in conditioner, followed by your favorite heavy moisturizer.
    Qhemet Amla & Olive Heavy Creme & Oyin's Whipped Pudding are two of my favorite products I deem extremely moisturizing. Some good leave-ins are Paul Mitchell, The Conditioner & Karen's Body Beautiful Sweet Ambrosia [formally known as hair milk] <-Love using this as a leave-in

    Wash N Go's:
    There are many methods to achieving a fabulous wash n go; so I will focus more on my favorite tools.
    Microfiber Towel [or you can try the budget fashionista method of using an old t-shirt] - I recommend every gal own a microfiber towel. I use this to gently wring out my hair before applying my hair gel. - Using a regular towel causes frizzy hair, but it can also cause split ends as well. You want to take care not to disrupt your curl pattern as you towel dry, which is why a microfiber towel/t-shirt will be your best friend!
    Denman Brush: I tried raking product through my hair with a Denman brush [after my hair has been thoroughly detangled], and was pleasantly surprised by the results. Instant popping of the curls ladies and gents!
    Eco Styler Gel w/Olive Oil: Pretty much the only thing that has consistently given me a decent wash n go! Check out my mini review/pics here: To check out my wash and go method, watch this video!

    I think I am going to break out the diffuser and do a massive curly-fro this weekend!  What are you doing to your hair this weekend?


     All pics courtesy of KurlyKinkyKeekeers


    Follow me on Twitter | Add me on Bloglovin' |  

    My Long List of Staple Hair Products!!


    With all of the product raves, reviews, and recommendations out there, it can be hard for a newbie to secure a roster of staple hair products. When I first started my hair journey, I bought every product mentioned on almost every hair board, and most of them went straight to the trash. It took a while for me to get a steady rotation of tried-and true products, so hopefully this list helps some of you out!

    The products with the asterisks are my favorite, and also receive high marks across most hair boards/review forums. If you are a newbie, or simply rebuilding your hair regimen; do yourself a favor and keep it simple, pick one product from each section [with the exception of the recommended tools section], and build your regimen from there.

    Recommended Tools:
    Soft Bonnet Hair Dryer - For Deep Conditioning
    Blow Dryer w/Diffuser Attachment - For Blowing Out Your Hair
    Jilbere Shower Comb - For Detangling
    Silk Bonnet - For Preserving Your Hair-Styles
    Steamer [I just did a review on the Huetiful Steamer, check it out] - For Hydrating Thirsty Hair
    Denman Brush - For "Smoothing" Out Sections of Hair Prior to Styling [detangle the hair with a detangling comb first]

    Shampoo's:
    Online: 
    In-Store: 
    Keracare Hydrating Detangling Shampoo **
    Goldwell Kerasilk Ultra Rich Care


    Conditioner's:
    Online:
    Jessicurl Weekly Deep Treatment **
    In-Store: 
    Herbal Essence Hello Hydration **
    VO5 Strawberries & Creme  **
    Dudley's Hair Mask
    Pantene Relaxed & Natural Breakage Defense Mask
    Deva Curl One C
    Kearacare Humecto **

    Leave-In Conditioner's
    Online:
    In Store:
    Giovanni Direct **
    Sebastian Potion #9 

    Moisturizer's:
    Online:
    Qhemet Amla Olive & Heavy Cream **
    Qhemet Burdock Root
    Oyin Whipped Pudding
    Karen's Body Beautiful Hair Milk **
    Oyin's Juices & Berrie's **
    In-Store:
    Deva Curl Set it Free
    Jane Carter Nourish & Shine **

    Protein Treatments
    Online:
    In Store:
    Dudley's Hair Rebuilder
    Sebastian 2+1

    Product's to help twist/braid:
    Online:
    Komaza Care Coconut Curl Pudding **
    Donna Marie Lock & Twist Gel 
    In Store:
    Miss Jessie's Curly Pudding
    Miss Jessie's Curly Buttercreme

    Oils:
    Online:
    In Store: 
    Coconut Oil ** - Most Grocery Stores
    Vatika Oil ** - Indian Grocery Stores
    Monoi De Tahiti Oil ** - Trader Joe's
    Brahmi Oil - Indian Grocery Stores

    Extras:
    Apple Cider Vinegar - For Closing Cuticles/Correcting PH Balance

    Follow me on Twitter | Add me on Bloglovin' |   

    Quick Tip: Two Tablespoons A Day To Healthy Skin, Hair & Nails


    Before you feverishly hit the back button because you've spotted a nice big bottle of Cod Liver Oil, hear me out!! - What you put IN your body is sometimes more important than what you put ON it. We tend to spend an exorbitant amount of money on topical products for clear, glowing skin, strong hair, and long nails; so why not look to one product that can give you all that, and is natural to boot! ->> Cod Liver Oil is comprised from the livers of fresh cod fish, and extremely high in Essential Fatty Acids, Vitamin A & one of the highest naturally occurring sources of Vitamin D. Finding these nutrients at these levels in your daily diet can be challenging, so taking a supplement like this one becomes even more desirable.

    Vitamin D - Acts as a natural antioxidant, heals and protects skin
    Essential Fatty Acids - Reduces inflammations, improves the structure of skin cells
    Vitamin A - The main component in helping correct skin disorders [acne, eczema, psoriasis, etc]

    Here's What You Do:
    Take one tablespoon of Cod Liver Oil at meal time twice daily [I do one dose in the morning, and one at night]

    Skin Benefits:  
    Clogged pores, and blackheads usually stem from a deficiency of Vitamin A. When a Vitamin A deficiency is present, new skin cells are unable to reach the surface layer of your skin. As a result, new skin cells remain trapped in your pores, where they eventually die.  

    Eczema: The Essential Fatty Acids found in Cod Liver Oil stimulates anti-inflammatory hormones, which can help treat blisters, and inflammations related to Eczema as well as Contact Dermatitis. While the EFA's help to treat inflammations, Vitamins A&D also work to heal skin, and keep it protected and hydrated. 

    Psoriasis: The Vitamin A found in Cod Liver oil helps to slow irregular/rapid skin cell production; this is good news to those suffering from Psoriasis because Psoriasis is caused partly by the over-production of skin cells.  

    Hair Benefits: 

    Cod Liver oil provides essential nutrients to your follicles that plays a major role in your overall hair health, and growth process. The vitamins and EFA's found in Cod Liver oil help's to create a smoother hair shaft, prevent hair loss, and contributes greatly to the amount of sheen, and durability of your hair. Cod Liver Oil is also rich in protein which means stronger hair for you!


    Nail Benefits: 
    Lack of Vitamin D can be the source of most issues with nails that are prone to chipping, and cracking. Regular consumption of Cod Liver Oil can lead to nails that are stronger, longer, and no longer prone to issues with chipping.

    What Type Of Cod Liver Oil Should You Get?
    My favorite [the one I can stomach the most] is Carlson's Norwegian Lemon Flavored Cod Liver Oil [Purchased from Whole Foods] - It is of optimum quality which means there is little to no fishy aftertaste, and it is lightly flavored with Lemon.


    Follow me on Twitter | Add me on Bloglovin' |

    Be Huetiful Steamer Review

     My hair after the steam treatment!
    This past Tuesday I received a hair steamer courtesy of Huetiful, and boy did it come right on time! I actually have a large steamer that I HARDLY use because it is just too cumbersome, and I just don't feel like pulling it out of the closet, assembling the thing, putting it back etc. - So needless to say, I was happy when this tabletop model came my way.

    Product: Huetiful Steamer - Shipping is FREE!
    Price: $114.95
    Facial Attachment: $9.95

     steamer arrived carefully packaged!

     Here are the product claims:
    The Huetiful Steamer is specifically designed for the unique needs of curly and wavy hair, restoring moisture 5x better than deep conditioners alone, opening up the cuticles of your hair to allow any conditioner you choose to penetrate better and work more effectively, bathing your hair with warm ozone enriched mist to replenish moisture lost from chemical treatments, and reducing breakage and split ends caused by dry hair.
    Does this product live up to it's claims? 
    Most definitely! My hair felt like butter after 10 minutes under the steamer. Detangling was much easier, and because of that, it cut my styling time in half.


    Who can benefit from regular Steam Treatments?
    Everyone! It doesn't matter if you are relaxed, natural, or transitioning. I definitely recommend this to anyone with highly-textured hair. Naturals will love this because it keeps hair soft, and eases detangling woes. Transitioner's will love this because it helps keep the new-growth soft, healthy, and manageable which is important when working with two different textures. Women that relax will also love this product because it works to keep issues with lack of moisture due to chemical processing under control.


    Why I love it?
    It's easy to put together, compact, and works just as well as my large hair steamer w/o all the fuss. This means I can enjoy steam treatments weekly, and even when I travel!

    Setup is a breeze, as there are only 3 components you need to connect. The fourth component, pictured on the far left, is a facial steamer attachment!

    To use connect the "wing-shaped" attachment to the base of the steamer...

    slide the hood attachment onto the "wing-shaped attachment" until secure...

    connect the nozzle from the "wing-attachment" to the hood attachment


     What I used:
    I used a mixture of Honey + Olive Oil [1/4 cup Honey + 3 tablespoons Olive Oil], and I applied it to clean, wet hair. I also added a bit of Tea Tree, & Lemon Essential Oils to my water for added therapeutic benefits [I purchased them from Whole Foods].

    To Use:
    Apply your favorite hair conditioner, and sit under the steamer for up to 20 minutes!

    Add water to the top of the component, filling until you reach the "max line" on the measuring cup included

    Use the stopper, to cover the hole. 

    Close the lid on the top of the compartment! Plug in, and in two minutes your steamer is ready for use!

    Tips to Having a Successful Transition - Part 1

    [source] 
    To seamlessly blend your two different textures, opt for a flexi rod set like the model above. Not only does rod-setting help blend the textures well, but you also cut down on manipulating the hair.  

    Ease Detangling Woes & Save Your Hair
    Detangling at any point in your hair journey can cause breakage, & splits; but you must take extreme care while transitioning as the line of demarcation is extremely fragile. You can make your own "detangling serum" in a snap out of herbs that can easily be found in your local health food store, or online at places like www.mountainroseherbs.com

    Here's my favorite mix:
    1 tablespoon Marshmallow Root
    1 tablespoon Irish Moss
    2 cups water
    1 tablespoon olive oil

    Add herbs to boiling water, and stir frequently until the consistency is that of a light gel. Once mixture has reached the desired consistency, strain mixture through cheesecloth, or a fine sieve. Add olive oil to serum, pour into a spray bottle, and use immediately.

    How do you use this? Section clean, damp hair into four quadrants, adding the serum to each quadrant. Detangle each section thoroughly, and either braid/twist to keep each section neat, then rinse. 
     

    Why this works? Irish Moss is rich in trace minerals which is very beneficial for your hair. Also, Marshmallow Root, & Irish Moss both release a mucilaginous substance that has abundance of minerals and proteins, and the mucilage that is released offers an incredible amount of "slip".


    Protein
    Protein is one of the key components when it comes to reducing breakage during your transition. Hair that lacks protein is exceptionally weak, and susceptible to breakage; especially around the line of demarcation. Your hair is comprised of mostly what is known as Keratin. Each time you chemically process your hair [relaxers, color treatments etc], it weakens the keratin protein structure, so regular protein treatments are recommend to temporarily strengthen the hair. How often you do protein treatments is determined by assessing the condition of your hair, an assessment is necessary as too much protein can cause breakage as well.
    NOTE:
    I also want to point out that thermal straightening, improper blow-drying techniques, and excessive use of heat can also contribute to a weakened protein structure. 

    How to assess if your hair is in need of a protein treatment? Is your hair "mushy", or "limp" when wet, does your hair "stretch" a lot when combed? Chances are you need a protein treatment.

    What type of protein treatment should I use? For those that are weary of hard core protein treatments like Aphogee, there are always other options. One of my favorite treatments is a 2+1 by Sebastian. It's two parts moisture, to one part protein, and the result is silky, soft, healthy, manageable hair. This product works so well, a deep conditioning treatment is not necessary.

    Another favorite of mine is Dudley's Hair Rebuilder, this is a little heavier in the protein department, but also imparts an incredible amount of moisture. This was also a go-to product for me because it corrects issues with elasticity, porosity, lack of protein, and lack of moisture. - This is the perfect product for transitioner's, as most tend to have issues with elasticity, porosity, moisture, and protein deficiencies.

    You can find both products at most professional beauty supply stores.

    Moisture Retention
    I have already talked about the effects of chemical treatments in relation to the porosity of your hair. This time I want to touch on other products that can also temporarily "fill the gaps" along the hair shaft to ensure moisture retention.

    Cellophane: Cellophane's can also temporarily deposit proteins that bind to the hair shaft; what this does is fills the gaps along the shaft to ensure that moisture loss is kept to a minimum. Not only can cellophane's help temporarily correct porosity issues, but they also help impart an incredible amount of shine as well.
    Jazzings, Adore, & Sebastian Colorshine's are all cellophane's that I have used with great results.

    You can find Jazzing at most Sally's beauty supply stores, and you can find Adore & Sebastian at most professional beauty supply stores. 

    Henna Treatments: Can also work to temporarily correct porosity in the same way that cellophane's work. If you have a relaxer it is highly recommended that you use Body Art Quality Henna, as Henna that isn't BAQ is purported to have chemicals in it that can cause an adverse reaction when applied to relaxed hair.

    One of the most reputable vendors I can recommend for BAQ Henna is www.hennaforhair.com

    Moisturizing Products
    Once you have corrected issues with porosity, it's time to feed your folicles with products to keep it soft, and moisturized. I tend to like products with added herbs, and essential oils, here are a few of my favorites:

    Amla & Olive Heavy Cream - Qhemet Biologics: This is probably one of the BEST moisturizing products I have used to date, and highly popular amongst transitioner's and naturals respectively. It contains a few of my favorite ingredients like Amla, Aloe, Olive Oil, and Brahmi!

    Leave In Conditioner + Water Combo - Take your favorite light leave-in, dilute with a little distilled water, and add it to a spray bottle. For a more softeness, opt for rose water or spring water in lieu of distilled. Rosewater can be found in most Indian Grocery stores in the cooking isle for about $3/32oz

    Seal In The Moisture!
    You can use any oil to seal in the moisture from your daily moisturizing treatments. To seal in the moisture apply a light layer of oil to your hair. Oil molecules are a lot larger than the tiny spaces along your hair shaft, so they cannot be absorbed; instead oil acts as a barrier to lock the moisture molecules in. Beware that a build-up of oils can also lock moisture out, so it is imperative that you remove product build-up regularly. Any easy non-abrasive way would be to use Apple Cider Vinegar as a final rinse, this is used by many as a gentle clarifier.

    Popular Posts